The First Time: Having a vegetable garden
Planting a vegetable garden may seem easy, but there can be many setbacks along the way.
 Amanda Sparks
This summer, my boyfriend of five years and I finally took the next step in our relationship. Not kids, marriage, or even living together, but to get a garden plot together at our local community garden.
We began the process back in April, when we paid our membership fee and our plot rental fee. Following this, we immediately rushed to Greenland and purchased as many seeds as we could find — everything from snap peas and green beans, to beets (of three varieties) and several more strains of carrots, even sweet corn and pumpkins.
All was going well up to then; we had a shopping bag of organic seeds (in accordance with our garden’s rules) and big plans. However, once we got to our plot, we quickly realized that the dozens of seeds we had bought would not all fit in our 3 x 6 metres plot. Thus came our first issue — what do we plant and where?
Planning the plot
Originally, I had prepared a sketch of our vegetable garden and had a list of all the dimensions and spacing each plant needed. I stared at this square for hours, researched what plants go beside each other best, planting tips, and a litany of all the questions I could think of. Eventually, I turned to my partner to hear his thoughts, seeing if he could spark an idea in me. All the books I read and the information online was overwhelming, at best, and not always suitable to our biome. Thus marks the first (and only successful) time I followed my partner’s advice — winging it.
On our designated planting weekend, we met at the garden plot with all our equipment, seeds, and watering cans. We spread out our seed packets, looked at them all, and slowly arranged them according to what we wanted most, and what we could spare.
Firstly, everything that didn’t follow the garden’s rules couldn’t be planted there, meaning anything that wasn’t organic or grew deeper than two feet down. Luckily, this didn’t narrow us very much. After we’d narrowed down our plants, we spread some compost over our plot, and began using a pointed hoe to create shallow trenches in our soil. We watered these trenches, and we placed two to three seeds in distances that were appropriate for each plant. Then we covered them back up and watered again.
On the weekend we’d planned to utilize as our final day of planting, I decided to adopt my partner’s laissez-faire attitude, meaning I didn’t plan and just figured it would all work out. For those of you who remember earlier language arts classes, this is an example of what our teachers called foreshadowing. Our last day was supposed to be four simple rows of snap peas and green beans. It was anything but. We headed to Home Depot that morning, looking for a handful of stakes and something to attach to those stakes for our plants to climb. That was all we needed.
After about five minutes looking around the store, we quickly realized we weren’t going to find what we needed. So, we grabbed too many too-long bamboo sticks and some weird green “gardening line” and headed to our plot to face the consequences of our choices. The bamboo was too thin and cut weird due to the fibres. The line was too spaced out and flimsy to provide any adequate support for our plants. Thus, we quickly realized that we’d soon be going through the whole thing once more.
Trellising our climbing plants
Luckily, each of the plants take a week or two to germinate, which meant that we had a week or two to solve this. I quickly went over to my trusty Pinterest and began searching for trellises other people had used on their gardens. Trellising is basically just the fencing needed behind climbing plants — in our case our peas and beans. These climbing plants hook onto this fencing and utilize its strength to help them stand straight, since their stems aren’t as strong as trees or other plants.
My chief concern was the wind. At our garden orientation, the manager of the garden had mentioned that due to the flat planes around us, our vegetable garden would face some of the strongest winds in all of the Edmonton area. Thus, we needed something that was sturdy enough to brave the wind, but wasn’t so harsh it would cut up our plants (like chicken wire). Eventually, I found some simple plastic “poultry netting.” I bought a roll and found some bigger and better stakes. Now I just had to assemble it.
After some measuring and sketching, I eventually decided to staple gun the mesh to three sides of my stake (back, outside, front), then run it diagonally across to the other stake and staple the other end of the mesh to that stake. It left me something like this:

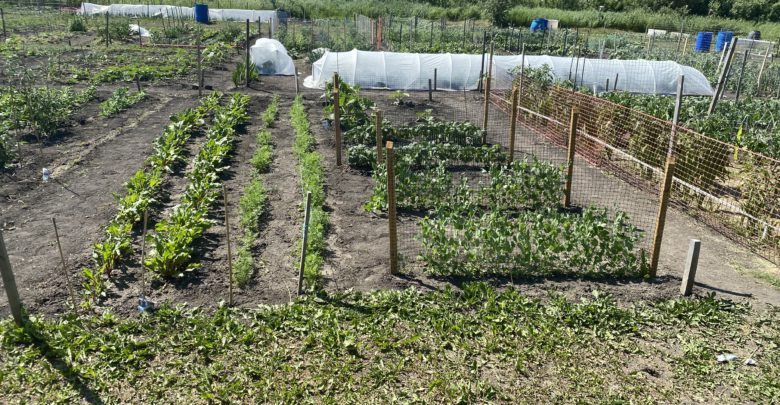
I left 10 centimetre at the base of each stake to be hammered into the ground, and labelled that space with the lengths and which row each trellis was to go to. I was hoping that running the mesh diagonally would reduce the jumbling it might get from the winds and keep my plants from getting cut up and killed. After a few weeks, this design has worked well; I haven’t noticed any issues with it and my plants are already climbing it.
One month out from planting, we had a lot of growth. We also had a ton of weeds. We spent a large portion of time weeding as we went, and at the end of the month, the two of us spent a good hour attempting to rid our plot of as many weeds as we possibly could. Other than that, the only other thing we’d spent a large portion of time on was the original planting. Watering our plot was 15 minutes (if that) every other few days.
While it has been a lot of work, I’m excited to see how our first vegetable garden progresses over the seasons.